Monday 27 January 2014

Stampotique Stars

May you touch Dragonflies and Stars
Dance with Fairies and talk to the Moon


I used CWS stencils Balzer layered stars and Dutch Doobadoo Faded Dots with DecoArt modelling paste on a piece of chipboard, punched and applied small chipboard stars
Painted DecoArt acrylic Carbon black, Dark Plum, metallic Peacock Pearl and Purple Pearl

Highlighted the stars with DecoArt metallic Lustre Silver Spark and Champagne Ice and the dots with Black Shimmer

The moon was cut from chipboard with DecoArt Modelling paste applied, painted with grey and highlighted with Silver Spark and Champagne Ice


Angel boy was stamped onto chipboard with black Stazon and sprayed with a mist made from Metallic Lustre Black Shimmer

Sunday 26 January 2014

Clarity Stamps New Beginnings Challenge


A new crafty journey started this January; I am taking the Kathy Byrne Mini Album monthly class at the Craft barn throughout this year, learning how to make Mini albums and books

I was eager to produce another wallet book that I'd learnt on the first class and thought using the Clarity Dandelion Fairy stamps fitted with the new beginnings challenge perfectly

I cut and scored the base of the wallet book from a 12’’ x 12’’ charcoal grey Bazzill Basics card.

To decorate, I used the Clarity Seaweed Stencil & Seaweed Frame
And used Mister Huey Manila & Taxi mist, Dylusions white and a spray made with DecoArt Black Shimmer Metallic Lustre, which creates a lovely steel grey metallic shimmer

The papers were then cut to size to decorate, stamped with the Dandelion Fairy and Leaf stamps. Labels made for the pockets and stamped with the dandelion Verse, using Adirondack Mushroom and Black Soot

The edges were distressed with Black Soot and mounted onto the base card with Cosmic shimmer Glue


Sunday 19 January 2014

Stampotique Stars


Smile loved having his head in the stars!
I cut and scored two star templates onto card, and stamped the first one with the Daniels Tree topper and Twinkle Twinkle little bat, these were coloured with Promarkers and distressed around the edge with Black Soot distress ink
The inside was painted with DecoArt Carbon Black and stamped DT Heads in silver Ink

The other star was painted with Decoart Dazzling Metallics Shimmering Silver
The centre was cut out and punched with small stars

The two were then put together and Smile got his head in the stars!

Friday 17 January 2014

Steampunk Chocolatier

As a kid I always wanted a chocolate dispensing machine well some years later my dream came true a brilliant Christmas stocking filler!!
When unwrapped, it was so Adams Familyesque just crying out to be steampunked!!

I started by removing the chocolate one by one very nice too! Although I did keep some for display purposes
I painted the entire object with a mix of DecoArt Carbon Black and Burnt Umber

Once dry I highlighted with DecoArt Metallic Lustre, Black Shimmer, Silver Spark, Iced Espresso and Gold Rush. These make a very easy metalized look, just by highlighting areas by applying with your finger tip

The dial and Label were printed using Craft Artist and distressed with black soot, walnut stain and antique linen and finished with Crackle accents.

The chocolate bar wrappers were all designed in Craft Artist and applied, the cover over them was made with clear acetate and the mini gears glued with Glossy Accents

The pipe embellishments are Prima Junk Yard Finding’s; all other embellishments are Tim Holts applied with Epoxy Resin

All steampunked, time to adjust the pressure, put in a penny and the Chocolate appears!
Hope You have enjoyed my fun project
Jools :)


Friday 10 January 2014

Stampotique Happy New Year- Anything Goes


As the bells rang in the New Year, The balloons fell and the party girls where filled with Glimmering Hope for 2014! (She’s on the shopping list!)

A very late Happy New Year! 

The background was created with Decoart texture paint, gesso and modelling paste. Using Clarity stencils Bubble & Seaweed, once dry I coloured with Dylusions Spays
The balloon shapes where highlighted with DecoArt Metallic Lustre Silver Spark and Champagne Ice


Moth Fab, Prom Queen and Moth Loved were stamped onto Silver Vellum, heat set and coloured with Promarkers and distressed with Black Soot

Thursday 9 January 2014

Stampotique Something New


My New Stamps!

I started by stamping the Row of Faces stamp and colouring with Inksense Blocks and DecoArt Dazzling Metallics for the background
The stamps were done using my newbies Hare, Chessy and Wombat!
they were coloured with Shinhan pens and distressed with Walnut stain and cut out with new pinking shears!

Saturday 4 January 2014

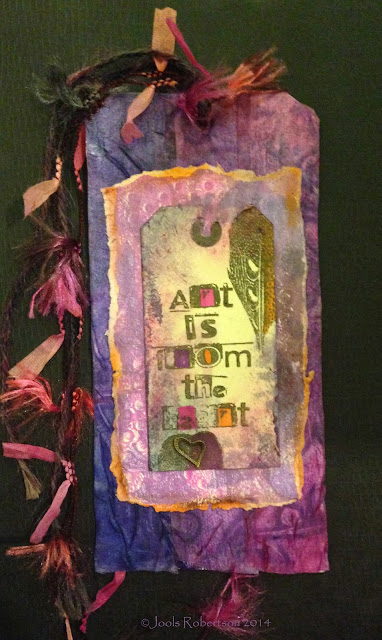
New Year Tag with new products


My new stamps arrived today from That Craft Place, Lisa’s Ditzie Designs
So I was eager to use them with some new products that were on my Christmas list
I started by stamping the Art from the Heart onto a small label, with the Paperartsy minis 99 feather
Which I then coloured in with ShinHan brush markers, these are new to me and they have a really cool large brush applicator and the colours are very vibrant

Then I distressed the edges with Derwent Inktense blocks and pencils with water around the edges
I then took some 3 stripes of ribbon and coloured them the Inktense blocks in a graduated colour sequence using the blocks with water, the colour becomes permanent when heat set
Its the first time I have used these and they are  brilliant, so versatile and the intensity of the colours is amazing
I then layered the ribbon over a gelli plate print background on a larger tag and applied with DecoArt glue and seal
Applied all the layers together and finished with some really pretty yarn and some string coloured with the inks