Tuesday 29 July 2014

Clarity Challenge Anything Goes


I keep seeing the lovely ATB, so thought great opportunity to make one use Clarity Stamps to decorate 

I created a 2" box and stamped with Garden Heart and then assembled 
Colour washed with DecoArt Quinacridone gold, distressed the edges with Barn Door & Walnut Stain Distress Inks
Then applied a thin layer of DecoArt One Step Crackle for tiny cracks


The handle and feet are Tim Holtz Hitch Fasteners as is the tiny heart on the chain 
I stamped the Wire Art Heart onto shrink plastic and coloured with Promarkers, punched a hole before shrinking for the jump ring fastener and applied a tiny gold melt art heart to the centre of this to embellish

Saturday 26 July 2014

Stampotique Christmas in July

Rollin, Rollin, Rollin Twinkies been Snowballing!
I wish it was Christmas just for a day to cool down!

The background was created by applying DecoArt Gesso to 8"x8" chipboard sheet
I tore some paper to mask out the hills and then applied DecoArt Dioxadine Purple and Aquamarine for the night sky
Once dry I used Titanium white to created the hills
and blended the purple and turquoise to shade the hills and the small moon

Once dry stamped the Owl tree with Stazon and highlighted the owls with moon light

The snowball was Created with modelling paste and painted and decorated with Stampendous Shaved ice flakes,Twinkie was coloured with Promarkers

Happy Christmas!

Friday 25 July 2014

A Vintage Journey Challenge- Just Stain It

A Vintage Journey have a new challenge 'Just Stain It'
use Tim Holtz Distress Stains any way! on any project!!

Here's what I did with them

I love distress stains such an instant easy application and to so many surfaces creating multiple effects
I decided to decorate a Tim Holtz Configurations Book


I made the paper covers by applying the ink to water colour paper, I wanted a vintage damask effect so started by layering lots of different stencils and colours
Bundled Sage, Stormy Sky, Honey Gold, Peacock Feathers,Rusty Hinge, Pumice stone my favourite as It casts a warm grey edge to other colours

I used Tim Holtz honeycomb, Prima damask and Heidi Swapp trellis along with stencil made from Tim Holtz framework trellis die
Rubbing the inks through really quickly and at times lightly to get more texture and spritzing with water and dabbing colours back with a baby wipe and Kitchen paper

Once dry I took a large damask stencil CWS Brocade and coloured through with Black Soot, Walnut Stain and Chipped Sapphire
 

Then applied the same stencil but sifted slightly and applied metallics distress stain Burnished Brass to create an overlay with a shadow

Then splattered walnut stain spritzed with water and the stood up to let the drips flow
This created a really soft watery distress look, all the effects are much softer on drying
I used the Birds & Baubles Wallpaper & Wood Weathered textiles Tim Holtz stamps on the covers
 Same technique used on the back cover
I painted the areas of the box that would be exposed and then applied the papers with glue and distressed around the edges with Pumice stone and Walnut Stain Distress Stains and blended with a wet wipe
A piece of braid to hide the join on the spine and coloured this with Pumice Stone, Walnut Stain and Burnished Brass distress stains

The front cover was decorated with a frame and flourishes covered with metallic embossing powder

The interior of the box was sealed with washi tape, covered with DecoArt Media Matte Medium and painted with Quinacridone gold, Burnt Umber and Carbon Black, the base of the compartments were lined with papers using Tim’s Faux suede technique using the same colours as above but with more green tones


A variety of embellishments were covered with DecoArt Carbon Black, then highlighted with Burnished Brass distress stain

The Background of the Heart was created using the Guilded Kraft Glassine technique using Distress Stains 

The Oval and Heart embellishment crackle effect produced using the DecoArt Media Crackle Glaze and then a coat of Media Ultra-Matt Varnish which removes the shiny gloss effect

I hope you have enjoyed my project, any questions please ask
Please pop back to A Vintage Journey and check out the other Design Team Projects and we look forward to seeing your Challenge Projects

Jools x

Sunday 20 July 2014

Stampotique Book Inspiration


My favourite Book is Alice in Wonderland,  loved from a small child amazing story and the incredible images 
A few years ago  I visited All Saints Church Daresbury Cheshire, which is the birth place of Charles Dodgson aka Lewis Carrol 
The church is incredibly beautiful and has stained glass windows that are based on the Alice drawings by John Tenniel so theres my inspiration

I used a size 10 tag and stamped the Tree, lavender, Stalks, Dandelion and small moon, then colour washed DecoArt Dioxadine Purple and Aquamarine

Gooseneck aka Alice, Mushroom group and Chessy stamped onto white card Coloured with Distress inks, Fired Brick, Stormy Sky, Chipped Sapphire, Peacock feathers, Seedless preserved and Marmalade

A bookmark for my favourite book!

Friday 11 July 2014

A Vintage Journey Dies and Distress Challenge


The latest Challenge to use any Dies and Distress Products


I love all things distress and the more distressed the better!
So when I saw this beautifully inspiring picture below of a dilapidated building
I wanted to recreate it, the colours are amazing such vibrant pinks and oranges contrasting against the turquoise tones and textures of the corrugated metal


The main background was created by randomly tearing corrugated cardboard and applied torn sections of Tim Holtz Texture Fades Bricked
Covered with Gesso, once dry I used Tim Holtz Distress Stains Peacock Feathers, Pumice Stone, Black Soot, Ripe Persimmon, walnut Stain and applied 3 times to get more intense colours


Playing around with the die cut layouts, more details on the dies to follow

I die cut the Tim Holtz window box die and strips of card, Painted these DecoArt Zinc allowed to dry then applied a thin layer of Decoart Weathered Wood to created small cracks once dry I applied a mix of DecoArt Titanium White, Desert Sand And Carbon Black and the magic crackle appears
these were then distressed further with Distress Inks Walnut Stain and Black Soot
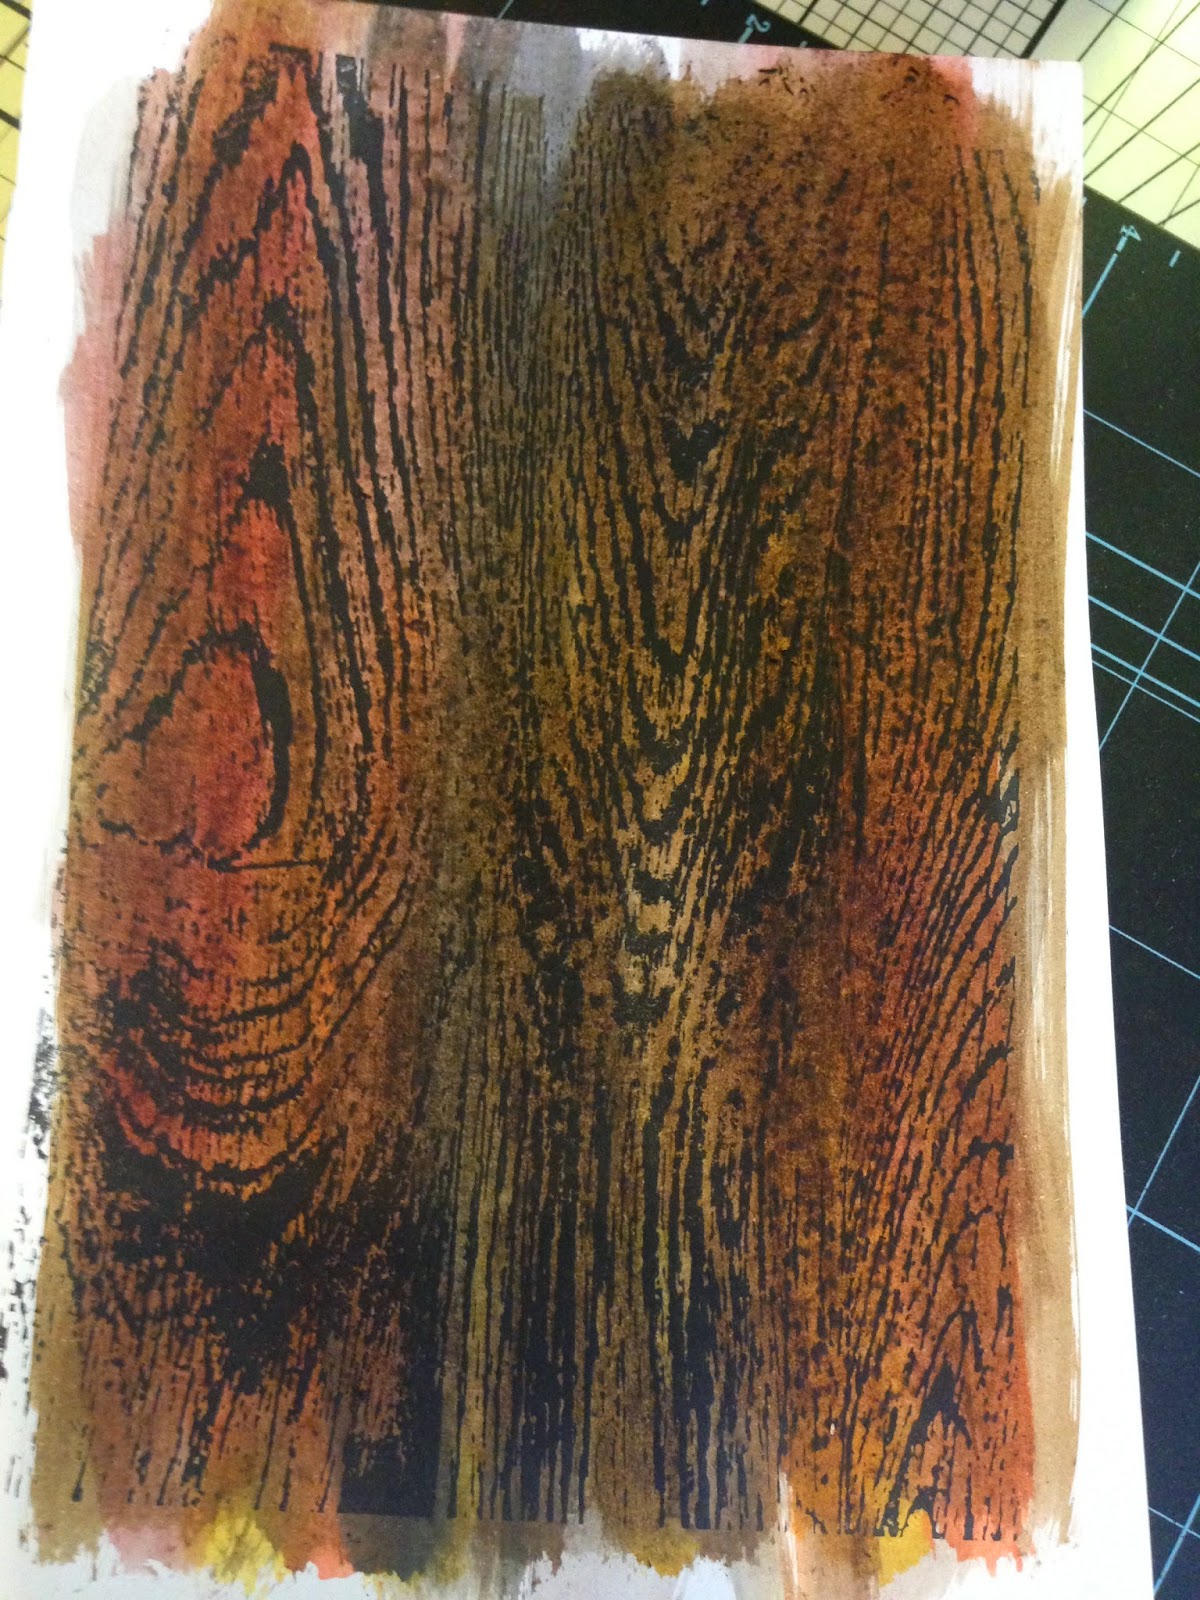

For the wood window boards I stamped the wood effect from Tim Holtz Wallpaper and Wood set, then used distress stains Ripe Persimmon, Walnut Stain and Black Soot distress inks, the edges where torn and  distressed with a sander 
The glass effect was created by applying DecoArt Texture glass and clear embossing powder to a piece of acetate and and then cut in a shatter effect


The canvas background was done by applying Texture Fades Bricked and torn randomly and glued and painted with Carbon Black, followed by a layer of Burnt Umber 
Dry brushed with Desert Sand, and the Titanium white, then applied a Quinacridone gold wash heavier in the outer areas


The leaves and butterflies were cut from Tim Holtz Spring Greenery and Butterfly Frenzy, and coloured with Distress stains Ripe Persimmon, Pickled Raspberry, Wild Honey and a little Walnut Stain then distress with Walnut Stain distress inks


I hope you have enjoyed my project,
Please pop back to A Vintage Journey and check out the other Design Team Projects and we look forward to seeing your Challenge Projects

Jools x

Thursday 10 July 2014

Stampotique Newspaper & Magazine

I have wanted to use the Beautiful Frida Kahlo stamp for some time, this challenge was the perfect opportunity

On research it would seem that there is some uncertainty surrounding Frida appearing in the 1939 French Edition of Vogue
Some documentation reference it was  a picture of her hand adorned with rings others say it was the full photography taken by Nickolas Muray at the time it seems no one is sure

The image did definitely appear on Vogue Mexico in 2012 to coincide with the opening of Appearances Can Be Deceiving: The Dresses of Frida Kahlo” at the artist’s eponymous museum: "Museo Frida Kahlo" in Coyoacan, Mexico

Another explanation is that the image of Kahlo was used for a mock-up of a Paris Vogue cover but it is said the that mock-up is a fake.
According to a Vogue Mexico rep, this is the first time Muray’s family granted permission for the image to be used on a fashion magazine cover.


In addition, the shot was recreated with actress Salma Hayek for a Paris Vogue cover that marked the 2002 biopic “Frida.”

Whatever the real story is, she's so beautiful she deserves to adorn the cover of Vogue again even if it is only my version

I stamped her image, Stampotique Frida Grand along with French script and the numbers cube
I painted with very pale washes of Distress Ink Tattered Rose, Victorian Velvet and Walnut Stain

Applied DecoArt one step crackle, once dry I distressed with Black Soot & Walnut Stain and embellished her headdress with tiny flowers coloured with Distress Stains

Sunday 6 July 2014

Stampotique Travel & Vacation

Olivia & Mr Stripes were on the case of a mysterious Vintage Journey!

I created a faux leather effect using the Sheena Douglas Technique using craft card and her embossing folder Silhouette Grasses 
These were coloured with Distress inks, Walnut Stain and Black Soot

The edges of the paper mache case were painted with DecoArt acrylic Burnt Umber and Quinacridone Gold

Olivia & Mr Stripes were stamped onto tissue paper, then covered with a wash of Quin Gold and Burnt Umber
 The tags and labels were coloured with Old Paper, Walnut Stain and Black Soot Distress inks


The inside was painted with Burnt Umber and a newsprint paper and the handle was distress too by sanding and scratching with a craft knife


Mystery solved the secret stamps are inside!