Monday, 28 September 2015

DecoArt Halloween Haunts

DecoArt Halloween Haunts Challenge
Click here for more details on taking part

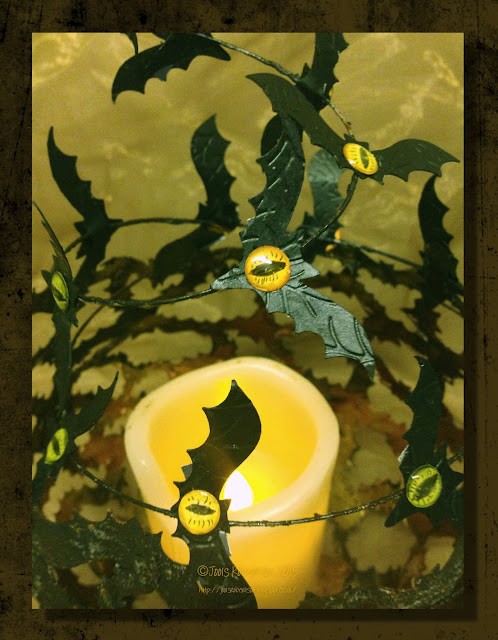
Bat and Bowl

To create my Cast iron bat cauldron/ lantern, I cut approx 150 bats in a variety of sizes and shapes in 300GSM card on a Cricut explore
I then applied them to a balloon to start the shape adhering them using a strong paper glue


Applied DecoArt Texture Sand Paste


Painted the inside with DecoArt Media Fluid Acrylic Metallic Gold and Quinacridone Gold with Carbon Black at the top 

The outside was coloured with Burnt Umber, Carbon black and Quinacridone gold to create a cast iron effect


The eyes were cut with a variety of sized punches and coloured with Promarkers 

Applied a large blob of Liquid Glass and allowed to dry for approx 8hrs 


The flying bats were embossed with a Tattered Lace leaf vein embossing folder and the eyes applied
Fixed with stripes of black paper to a piece of coiled wire which had the same technique as the external surface of the bowl
  

Happy Halloween Haunts!

Sign up to the DecoArt Media Newsletter for more information about taking part in the Halloween Haunts Challenge 
Starts 1st October

Materials
DecoArt Media Fluid Acrylic
Metallic Gold
Quinacridone Gold
Carbon Black
Burnt Umber

DecoArt Texture Sand Paste
Liquid Glass

300GSM Card
Embossing Folders
Coloured Pens

Friday, 25 September 2015

Stampotique Early Halloween

Bats in the Belfry
This weeks challenge is Early Halloween which is fine by me!
I've been waiting for this little bat stamp to arrive for about 4 months, he didn't arrive when he should have but he turned up early for Halloween!!

I remembered this very spooky picture that was taken  in Lynton, North Devon and thought the Owl Tree and Batty would look perfect against the dramatic sky
I stamped them both with Stazon and colour with Promarkers

Thursday, 17 September 2015

Stampotique Milestones

This weeks challenge is hosted by Kathi and the theme is milestone birthdays well here's mine coming up soon!

I applied some chipboard significant numbers to a Tando Media Card
and applied some crackle paste to the numbers

Applied DecoArt Cobalt Teal Hue and Prussian Blue, wiped back on the numbers and applied Metallic Gold followed with Distress Inks Dusty Concord and Victorian Velvet

Jasmin was coloured with distress inks, Peacock Feathers, Tea Dye, Pine Needles and Spiced Marmalade

Saturday, 12 September 2015

DecoArt Autumn Canvas Tutorial


Apply Modelling Paste through a Stencil with a palette knife spread smooth on some and 
texture on others
  
 Add texture with the palette knife

Create a random layout with a variety of textures
Once dry, apply the Crackle Paste through a Stencil with varying thickness on the individual leaves to create variable crackles
Thicker application will give you larger cracks
 Applied in a random pattern overlaying some of the modelling paste leaves
 Applying Colour
Apply a small blob of Yellow Oxide directly onto the canvas and spritz with water
Lighter colours at the top of the canvas graduating darker at the bottom
 Wash across selected areas, add Green Gold and work in
 Apply a wash of Carbon Black 
Wipe back with a baby wipe to soften
 Spritz the Media Misters and in some areas spritz with water to dilute and spread
 This is a process of gradually building up the weight of colour
I applied the stronger colours to the leaves as I wanted these areas to stand out more and wanted the colour to be focussed on the textured areas

I also wiped back some of the colour with a babywipe to reveal the raised areas and textures
 I worked Dioxadine Purple and Burnt Umber around the edges of the leaves to give a little more definition
 Wipe back the colour to expose the leaves and work the colour around until happy
Once I was happy with the overall colour balance, I highlighted some of the leaves drybrushing Titanium White

 Applied Burnt Umber through a spot stencil around the leaves and stamped a Script stamp randomly
Followed with a floral foliage around the edges and between the leaves with Black Stazon
Applied a very diluted Carbon Black wash to tone down the bottom of the Canvas and areas of brighter colour

Close Ups


 I like the contrast of textures of the canvas, the slight sheen on the areas with Crackle Paste and the Matt Modelling Paste areas but you could apply a varnish if required
 DecoArt Media Products have a variety to choose from including Ultra Matt, Satin, Soft Touch and Gloss

Materials

Media Modelling Paste
Media Crackle Paste

Media Mister
Orange
Violet
Purple

Media Fluid Acrylics
Raw Umber
Carbon Black
Titanium White
Dioxadine Purple
Quinacridone Gold
Green Gold
Yellow Oxide

Thursday, 10 September 2015

Stampotique Use 2

Use 2
This weeks challenge is to just use two stamps!

I decided to use France Papillion Majestic Tree and Romantic Text

Applied a watered down Grunge Paste in horizontal brush strokes for a little texture

This was a great opportunity to try my new Cosmic Shimmer Watercolours
they create a fabulous subtle metallic sheen
I used colours from the Metallics and Summer Garden Palettes followed with lots of over stamping with Orange Zest, Cloudy Sky and Black Stazon

Tuesday, 8 September 2015

DecoArt Peacock Eyes Canvas

Pretty as a Peacock

Thank you for popping over, for the full tutorial 
Please click the Blog button

Jools :)

Saturday, 5 September 2015

Stampotique Perfectly Primary

Primary Focus
This week challenge comes from Sue Davies and what a challenge, I would never usually select the 3 primaries to work with but it was a lot of fun trying not to get mud!

Applied Ultramarine Blue, Diarylide Yellow and Pyrrole Red acrylic in a circular pattern, also scratched with the end of the brush and brushed Titanium White 
Decorated with washy tape, ribbon and elastic bands in the primary colours 
Stamped barcode in Titanium White and applied the yellow and blue over areas and added more colour with Oil Pastels

Stamped Schmurfy and coloured with primary Promarkers colours